- Contents
AIM Receiver Help
Configure Account Placements
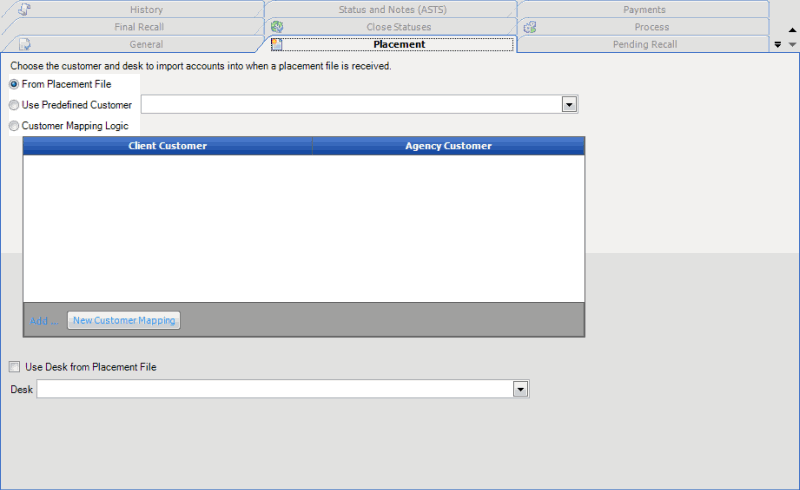
Use the Placement tab in the Client Configuration window to configure account placement settings for a client. You can specify which customer and desk to assign to accounts that a client places with your organization.
To configure account placement settings
-
In the AIM Receiver Manager window, in the Name column of the data grid, click the Client icon. The Client Configuration window appears, with the General tab selected.
-
Click the Placement tab.

Use Desk from Placement File: If selected, the import file contains the desk to assign to accounts.
Desk: Desk to assign to accounts.
-
Do one of the following:
-
If the import file contains the customer to assign to accounts, click From Placement File.
-
To specify the customer to assign to accounts, click Use Predefined Customer and then, in the list box, click the customer.
-
If the import file contains customer codes that you can map to existing customers, click Customer Mapping Logic and then do the following:
-
Click New Customer Mapping. AIM Receiver Manager adds a blank row to the data grid.
-
In the Client Customer column of the data grid, type the code included in the file that identifies the client.
-
In the Agency Customer column of the data grid, type the code for the existing customer to map to the client customer code.
-
Do one of the following:
-
If the import file contains the desk to assign to accounts, click Use Desk from Placement File.
-
If the import file doesn't contain the desk to assign to accounts, in the Desk list box, click the desk to assign to accounts.
-
Complete the information and then click Apply.


