- Contents
Latitude Help
Modify a Balance-Based Fee Schedule
Use the Fee Schedule dialog box to modify a balance-based fee schedule.
To modify a balance-based fee schedule
-
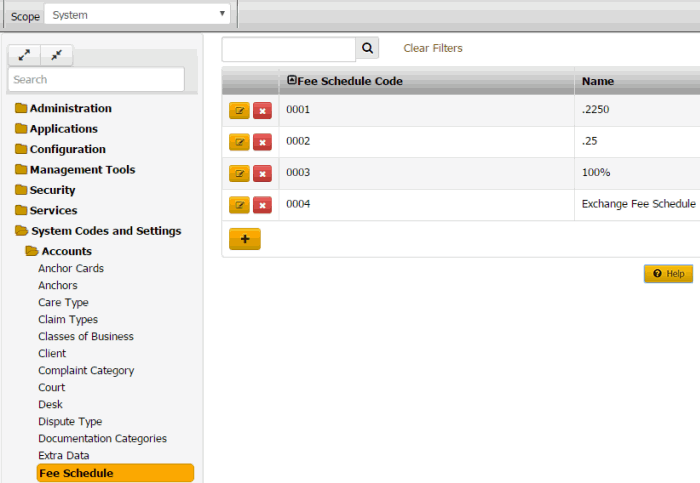
In the Navigation pane, click System Codes and Settings > Accounts > Fee Schedule.

-
Click the Edit icon. The Fee Schedule dialog box appears.

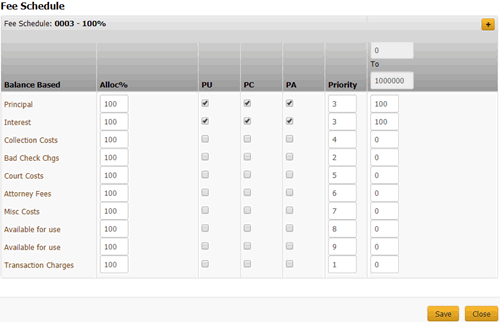
Fee Schedule Code/Name: Number and name that identifies the fee schedule.
[Money Buckets]: Repositories for amounts you want to record in Latitude.
Alloc %: (Allocation percent) Percentage of the payment amount to allocate to the money bucket. The amount available to allocate toward a money bucket is the remaining payment amount to allocate times the money bucket's allocation rate. When Latitude allocates all the money buckets and an amount to pay remains, Latitude allocates the remaining amount based on priority. If the balance in a money bucket is less than the allocation amount, the remaining allocation amount becomes available to allocate to other money buckets with a lower priority.
PU: (Paid Us) If selected, client invoices include the amounts shown or paid into the money bucket for this payment type.
PC: (Paid Client) If selected, client invoices include the amounts shown or paid into the money bucket for this payment type.
PA: (Paid Agency) If selected, client invoices include the amounts shown or paid into the money bucket for this payment type.
Priority: Order in which to apply payments to the corresponding money bucket. Latitude applies payments to the money bucket with a priority of "1" first. If there are funds remaining, the system applies the payment to the bucket set as priority 2. The system continues applying the payment until no funds remain or the account balance is zero. If the account has a balance after applying the full payment amount received, the system applies the next payment you receive to the highest priority bucket that has a balance remaining. Generally, you order the priority from 1 to 10, from top to bottom.
To: Account balance range in which to apply fees. The first To column is always active, and indicates the first (or only) account balance range to use for the specified fee. For example, if you set the fee code to apply for balances from $0 to $999.99, this fee is the only one applied to the account. You may want to accept the default, which is $0 to $100000000 (so as not to activate any other fee schedule columns).
[Percent]: Percentage to set as the fee for each money bucket for the specified account balance range. For example, if you type an amount of "25," all payments applied toward the Principal bucket generate a fee of 25 percent of the money collected.
-
In the Alloc % column, specify the percentage of the payment amount to allocate to each money bucket.
-
In the PU, PC, and PA column, select or clear the check boxes to indicate whether to include these payment types on client invoices.
Note: If you don't select at least one of these check boxes, the system displays a warning message. To continue without selecting a check box, click OK.
-
In the Priority column, specify the order in which to apply payments.
-
In the To column, do the following:
-
Specify the beginning and ending account balance range in which to apply fees.
-
Specify the percent to calculate as the fee for each money bucket.
-
To set up subsequent account balance ranges, do the following:
-
Click the plus sign (+). The system inserts a column.
-
Type the next account balance range to use for applying fees.
-
Specify the percent to calculate as the fee for each money bucket.
Tip: To delete a "To" column, click the minus sign (-).
-
Click Save.
Related Topics
Search for a Permission or System Code
Fee Schedules


