- Contents
Interaction Connect Help
Configure Account Codes
Administrators can create and configure Account Codes in Interaction Connect.
Requirements: You need the appropriate rights to both display the Account Code view and to configure account codes. See Requirements for Configuring Account Codes.
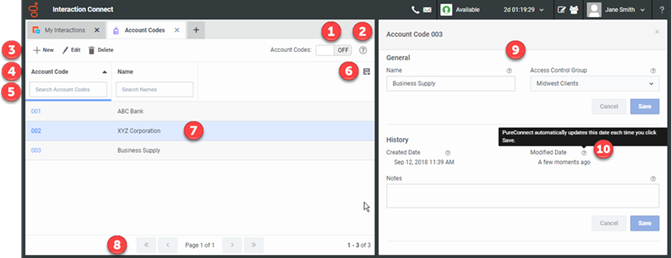
Account Codes view
Display the Account Codes view by doing one of the following:
-
Click the Administrator Views button, then click Account Codes.
-
Use the Add Views dialog box. Account Codes appears under Administration.

| Account Codes view | ||
|
1 |
Account Codes |
Toggle switch for enabling account codes. This makes Account Codes generally available for assignment to interactions. Users must still meet the Requirements for Assigning Codes. Note: The Account Codes toggle switch is visible only if you have the Master Administrator right, Administrator Access rights to all account codes, or Administrator Access to account codes in all Access Control Groups. It is not visible if you have Administrator Access only to some account codes; for example, selected individual account codes or account codes in selected Access Control groups. |
|
2 |
Help |
Click for Account Codes view help. |
|
3 |
Toolbar |
New (Add), Edit, and Delete controls. Note: The New button is enabled only if you have the Master Administrator right, Administrator Access rights to all account codes, or Administrator Access to account codes in all Access Control Groups. The New button is disabled if you have rights to only some account codes. |
|
4 |
Column headings |
Sort the list by clicking the Account Code heading. Move columns by dragging and dropping column headings. For more information, see Customize Columns. |
|
5 |
Search |
Search for account codes by code number or name. |
|
6 |
Choose Columns |
Use the Choose Columns control to add or remove view columns. |
|
7 |
Account Codes |
A list of currently configured account codes. |
|
8 |
Paged display |
If you have more account codes than fit in the view, use the paging controls to scroll through the list. |
|
9 |
Configuration panel |
A slide out panel for adding or editing account codes. |
|
10 |
Help |
To display help for a selected field, point to this icon. |
To configure Account Codes:
-
Select the Account Codes view.
-
Do one of the following:
-
To add an account code, click New.
-
To edit an account code, select the code and click Edit.
-
To delete an account code, select the code and click Delete.
Note: When you add or edit an account code, the slide out panel appears.
-
In the slide out panel, complete these fields:
|
Code |
An account code is a set of numbers zero through 9 (up to a maximum of 50 digits). These numbers are associated with the account name. Note: Account codes with leading zeros appear first in reports. For example, PureConnect sorts account numbers 1, 3, 20, 213, 0214, 1234, and 001235 as 001235, 0214, 1, 1234, 20, 213, and 3. |
|
Name |
The name of the account code. You select an account code by name when assigning an account code to an interaction. |
|
Access Control Group |
An Access Control Group (ACG) is a group of administrative rights. If you assign an ACG to an account code, then users must have this right to edit this account code configuration. You can assign only one ACG to an account code. Note: This list appears only if the PureConnect administrator configures Access Control Groups in Interaction Administrator. |
- Depending on whether you are creating or editing an Account Code, click Create or Save.
-
Optionally, manually document configuration changes in the Notes text box.
|
Created Date |
PureConnect automatically sets this date when a user creates the initial configuration for this account code. The date could be blank if an administrator created this account code during the initial PureConnect setup and configuration. |
|
Modified Date |
PureConnect automatically updates the date each time you click Save. |
|
Notes |
Type notes about configuration settings and changes. To identify the date of each note, you can manually enter the date beside each entry in the Notes field. |
-
Click Save.
-
After saving all configuration setting, click the X to close the slide out panel.
-
In the Account Codes view, set the Account Codes toggle to ON to enable Account Codes globally.
Note: This makes Account Codes available. To use account codes, users must still meet the Requirements for Assigning Codes.


