- Contents
Interaction Connect Help
Transfer a Call to a Workgroup
Requirements: You need the Search Workgroup Queues Access Control right to a specific workgroup queue in order to transfer an interaction to that workgroup queue.
You can transfer a call directly to a workgroup listed in the Workgroup and Profile directory. This type of call transfer is similar to a blind transfer because you do not speak to the transfer recipient. These procedures assume you are transferring calls from My Interactions, but you can transfer calls from any queue you are monitoring.
The CIC administrator creates workgroups in Interaction Administrator. Workgroups are logical groups of users (e.g., departments) that can function as a group in the CIC system. Workgroups can have extensions and queues that enable all members of a workgroup to receive calls notifying the workgroup. In addition, workgroups can receive regular calls and ACD calls that are routed to specific workgroups and agents. Workgroups can also serve as distribution lists (to the members) of voice mail, email messages, and faxes from within CIC.
Note: Before you can transfer a call to a workgroup, you need the appropriate right assigned in Interaction Administrator to view the workgroup.
To transfer a call to a workgroup:
-
Inform the caller that he or she is going to be transferred.
-
While the call is still connected, do one of the following:
-
-
On the Queue Control toolbar, click the Transfer button.
-
Right-click the call and choose Transfer from the menu that appears.
-
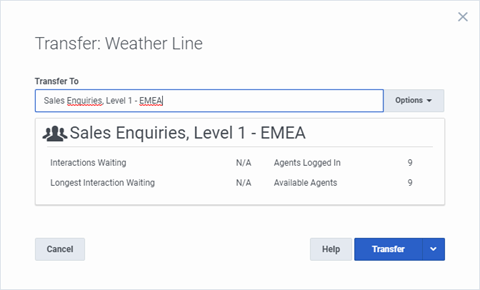
Result: The Transfer dialog box appears.
-
In the Transfer To: text box, type all or part of the Workgroup’s name or number.
Result: A drop-down list of choices appears.
Tip: If the drop-down list does not contain the workgroup you expected, check the search criteria selected in the Options drop-down list and make sure Workgroups is selected.
-
From the Transfer To drop-down list, do one of the following:
-
-
Select the appropriate workgroup name and associated extension number.
-
Select "Dial [your entry] as Digits" to convert a text entry into numbers.
-
Result: Status information for the selected CIC Workgroup appears. This enables you to check the workgroup’s current statistics before transferring the call. Use this information to estimate the probable wait time for a transferred call.

-
Click the Transfer button.
Result: The transferred call disappears from My Interactions or other queue and is routed to the selected CIC Workgroup.
Using the Workgroups and Profiles Directory to Transfer a Call
Note: Before you can transfer a call to a workgroup using this method, you must Display the Workgroup and Profile View. You also need the appropriate user rights to view the name of the workgroup in the Workgroup and Profiles directory.
To transfer a call to a Workgroup in the Workgroups and Profiles directory:
-
Tell the caller that he or she is going to be transferred.
-
Do one of the following:
-
-
Drag the call to a workgroup in the Workgroups and Profiles directory view. In the Transfer Confirmation dialog box, click Transfer.
-
Select a workgroup name in the Workgroups and Profiles directory view and press Enter.
-
Click on a workgroup name in the Workgroups and Profiles directory view. In the Directory toolbar, click Transfer.
-
Result: The call disappears from My Interactions and is transferred to the appropriate Workgroup queue.
Related Topics


