- Contents
AIM Help
Create a Placement File
Use the Place Accounts window to create a file to place accounts with a single agency or attorney. AIM ignores constraints associated to the agency or attorney. To create placement files for multiple agencies and attorneys, see Export Data to a File. To create placement files using business rules, see Create a Placement File Using Business Rules.
To create a placement file
-
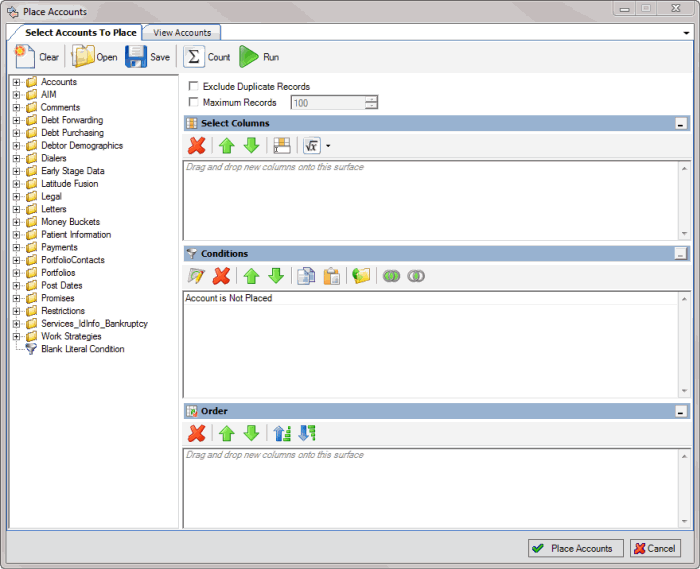
In the menu bar, click Actions, click Create, and then click Placements. The Place Accounts window appears. The "Account is Not Placed" condition appears by default.

-
To exclude duplicate records from the results, select Exclude Duplicate Records. For example, if you created a condition for a specific SSN, AIM only includes one account with that SSN in the results.
-
To limit the results to a specific number of records, select Maximum Records and then type or select the maximum number of records to include in the results.
-
In the Select Columns pane, add, modify, or delete columns as necessary. For more information, see Query Columns.
-
In the Conditions pane, add, modify, or delete conditions as necessary. For more information, see Query Conditions.
-
In the Order pane, set up and arrange the sort order as necessary. For more information, see Query Order.
-
To count the number of records that match the specified criteria, in the toolbar, click Count. The results appear in the Query Designer dialog box. Click OK.
-
To view the accounts that match the specified criteria, in the toolbar, click Run. The query results appear on the Results tab. For more information about working with query results, see Query Results.
-
To save the query, do the following:
-
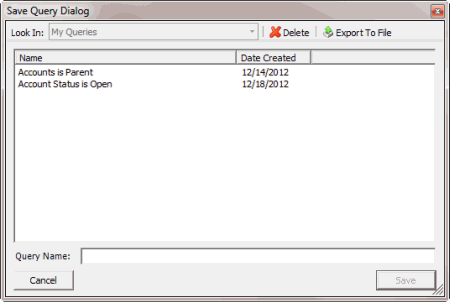
In the toolbar, click Save. The Save Query Dialog box appears.

-
In the Query Name box, type a name for the query and then click Save.
Tip: To overwrite an existing query, in the Name column, click the query to overwrite and then click Save.
-
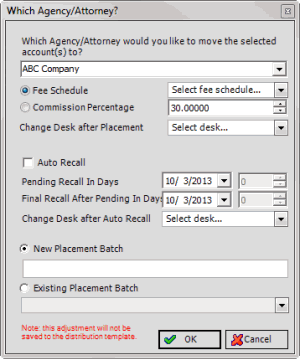
To place the accounts, click Place Accounts. The Which Agency/Attorney? dialog box appears.

Which Agency/Attorney: Agency or attorney to place the accounts with.
Fee Schedule: If selected, specify the fee schedule to use to calculate commissions.
Commission Percentage: If selected, specify a commission percentage to use to calculate commissions.
Change Desk after Placement: Desk to assign to the accounts after places the account.
Auto Recall: If selected, AIM flags the accounts for automatic recall based on the dates specified. AIM generates automatic recalls when it exports recalls for accounts that are due for recall.
Pending Recall in Days: Date or number of days after account placement to wait to set the pending recall flag.
Final Recall After Pending in Days: Date or number of days after AIM sets the pending recall flag to wait to set the final recall flag.
Change Desk after Auto Recall: Desk to assign to the accounts after AIM recalls the accounts automatically.
New Placement Batch: If selected, type the name of the placement batch to create for the accounts.
Existing Placement Batch: If selected, click the name of the existing placement batch to which to add the accounts.
-
Complete the information and then click OK. AIM shows the progress in the Execution Window.
-
Click OK. AIM creates a placement file and saves it to the folder specified in global settings. If your organization configured FTP in global settings, AIM saves a copy of the file to the agency's or attorney's AIM folder on the FTP site. If your organization configured email messaging in global settings, AIM sends an email message to the agencies and attorneys indicating that a placement file is available. For more information, see Specify General Global Settings.


