- Contents
Latitude Console Help
Split a Payment Between Linked Accounts
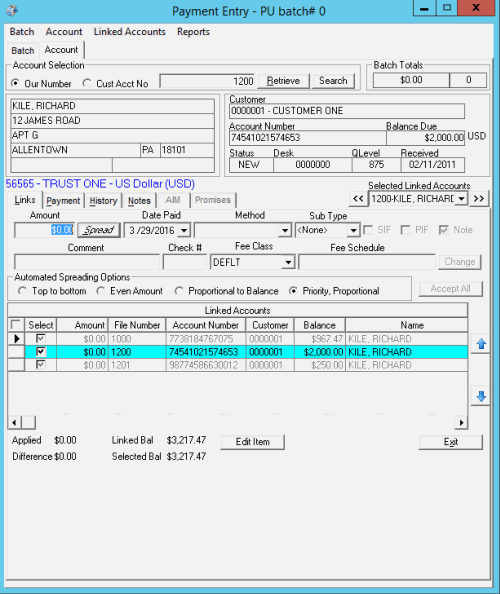
Use the Links tab on the Account tab in the Payment Entry window to split payments between linked accounts. If you have multiple linked accounts for the same customer, you can split the payment and apply a portion of the amount to each account. The Links tab only displays accounts with bank information that is compatible with the initially selected account. If an account isn't a linked account, the Links tab is unavailable.
Note: If you are only adding a payment for the selected linked account (not splitting the payment), click the Payment tab and do the steps to Add a Payment to an Account.
To split a payment between linked accounts
-
In the Main Menu window, from the Apps menu, click Payment Entry. The Payment Entry window appears.
-
Do one of the following:
-
If you know the file or account number, do the steps to Retrieve an Account by Account Number.
-
To search for an account using simple search, do the steps to Search for an Account Using Simple Search.
-
To search for an account using advanced search, do the steps to Search for an Account Using Advanced Search.
-
On the Account tab in the Payment Entry window, click the Links tab.

Amount: Payment amount received.
Date Paid: Defaults to the batch date. To change the date, click the arrow and select the date from the calendar.
Method: Payment method.
Sub Type: Code to categorize the batch type.
SIF: (Settled in Full) If selected, the client considers the payment a settlement to the account.
PIF: (Paid in Full) If selected, the payment covers the entire balance and the client considers the account paid in full.
Note: If selected, the system creates a note when posting the payment.
Comment: More information regarding the payment or account.
Check Number: Check number for a payment made by check.
Fee Schedule: Fee Schedule is blank, indicating that each linked account uses its own fee schedule.
Automated Spreading Options
Top to bottom: If selected, the system spreads the payment over each linked account in the order the accounts appear in the data grid.
Even Amount: If selected, the system spreads the payment evenly over each linked account.
Proportional to Balance: If selected, the system spreads the payment over each linked account proportional to the current balance.
Priority, Proportional: If selected, the system spreads the payment over each linked account by priority of the check and proportional to the current balance.
Linked Accounts
Note: The columns that appear in the data grid are based on your selections in the Grid: Linked Accounts dialog box. For more information, see Hide or Show Linked Accounts Columns.
Select: If selected, the system applies the payment to the account. Defaults to the primary customer on the account.
Amount: Payment amount to apply to the account.
File Number: Unique code that the system assigned to identify the account.
Account Number: Code that the client assigned to identify the account.
Customer: Code that identifies the client.
Balance: Current balance on the account.
Name: Name of the customer on the account.
Tips:
-
To change the order of the columns in the data grid, click a column and drag and drop it to the new location.
-
To change the sort order of the rows in the data grid, click a column heading. The system supports primary and secondary sorting (by one column, then another). The system saves the sort order and uses it the next time you open a linked account.
Applied: Total payment amount to apply.
Difference: Difference between the payment amount received and the amount applied.
Linked Bal: Total account balance for all linked accounts.
Selected Bal: Total account balance for all selected accounts.
-
Complete the payment information.
-
To specify which accounts to split the payment among, do one of the following:
-
To select all linked accounts, click the check box next to the Select column.
-
To select specific linked accounts, in the Select column of the data grid, select the check box for the specific accounts.
Note: If a payment batch exists for a selected linked accounts, a warning message appears indicating that a payment for the linked account is pending in an existing payment batch. Click OK.
-
Click Spread to apply payments to the selected linked accounts based on the specified spreading option.
-
Optionally, to change the payment amount for a linked account, do the following:
-
In the Amount box in the data grid, type the payment amount.
-
Press the Tab key. The system recalculates the applied and difference amounts. If the applied amount is greater than the payment amount, the difference appears in red. If the applied amount is less than the payment amount, the difference appears in green.
-
When the applied amount equals the payment amount, and the amount applied to the linked accounts is correct, click Accept All. The system applies the payment to the specified linked accounts and includes it in the current batch. The system clears the Account tab.
-
You can select another account to add payments to this batch, or click Exit.
Related Topics


