- Contents
Interaction Desktop Help
Chat Window
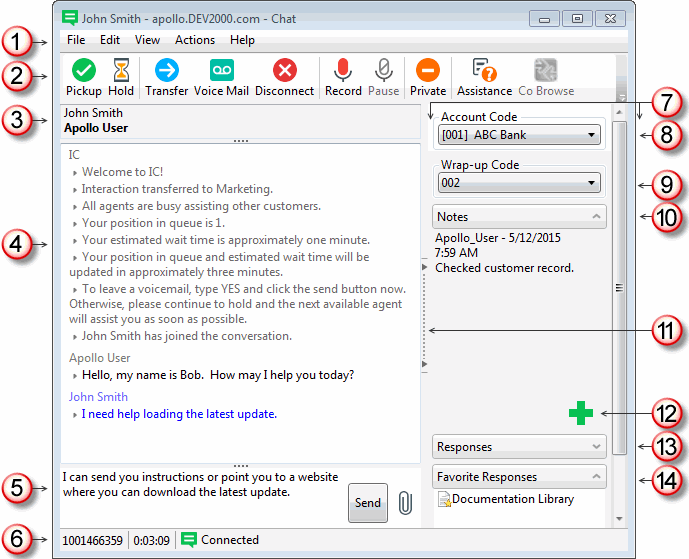
The Chat window provides the necessary tools for participating in a chat interaction.

|
1 |
Use these menus to perform various actions during a chat. For more information, see Chat Window Menus. |
|
|
2 |
The toolbar contains buttons for most of the functions for managing a chat session. For more information, see Manage a Chat Session. Tip: Keyboard shortcuts are also available for these functions and are listed on the View menu. You control whether the toolbar is displayed and which buttons appear. For more information, see Configure Chat Window. |
|
|
3 |
This section displays the names of the chat participants. The word (Typing) appears after the name of a chat member who is typing a response that hasn't yet appeared in the Chat Window. Note: The name of a remote web chat participant can appear as a telephone number if the original chat request was an SMS text message routed as a chat request. For more information, see Working with Chat Sessions. |
|
|
4 |
The Conversation area displays the pre-configured automatic messages that CIC sends when the chat begins, plus all chat text from all participants. Note: If your CIC administrator enables text filtering, certain sensitive information such as credit card numbers or Social Security numbers is blocked from view. You see only some replacement text such as ########## instead of the numbers. |
|
|
5 |
Compose your reply to an ongoing chat, then click Send or press Enter. Tip: Press Ctrl+Enter to insert a line break. Use Ctrl+Backspace to delete the previous word. You can also use Ctrl+arrow keys to navigate within the composition area. You can:
Note: You can send a file to a visitor who starts a chat session from your company’s website (web chat). This function is not available when you are chatting with other CIC users (intercom chat). However, you can send text containing the file path to other CIC users.
|
|
|
6 |
The Status bar displays the ID number, duration and state of the interaction. For more information, see Queue Contents. Note: You control whether the Status bar is displayed. For more information, see Configure Chat Window. |
|
|
7 |
The appearance of the sidebar area can vary based on your user rights. It contains controls and information that are related to the chat. Note: You control whether the sidebar is displayed. For more information, see Configure Chat Window. |
|
|
8 |
Some companies categorize interactions by customer. If you have the appropriate rights, you can assign an Account code to a chat interaction. |
|
|
9 |
If you are a member of a workgroup for which Wrap-Up codes are configured, you can use this drop-down list to assign the code. |
|
|
10 |
Use the Notes section to add notes or comments about the ongoing chat. Other chat participants do not see these notes. Note: These notes are visible to other CIC client users who are "Listening to" (monitoring) this chat. For more information, see Monitor a Chat. After a web chat is disconnected, these notes can be available in the Notes section of the Related Items view if the remote party is identified and the CIC system collects this information. For more information, see your CIC administrator. |
|
|
11 |
If you prefer not to see the sidebar area, click the splitter to hide that part of the Chat window. Click the splitter again to restore the sidebar area. Note: You can also use the View menu to control whether the toolbar is displayed. For more information, see Configure Chat Window. |
|
|
12 |
Click this icon to open the Notes text box and add a note to the chat. |
|
|
13 |
Select a pre-defined response. For more information, see Use Response Management During a Chat Session. |
|
|
14 |
A list of your favorite personal responses appears here. Double-click a favorite response to use it in your reply. For more information about designating some of your personal responses as favorites, see Manage Favorite Responses. |
Related Topics


