- Contents
Interaction Desktop Help
Customizing Toolbars
Requirements: The Customize Client Security Right enables you change the buttons in a toolbar. You also need specific rights to add and use buttons on the Queue Control Toolbar. For more information, see Using the Queue Control Toolbar.
You can add, remove, or rearrange buttons on the CIC client toolbars.
Add, Remove, or Rearrange Buttons
The Queue Control Toolbar appears on each queue management view (such as My Interactions). The Directory Toolbar appears on each directory view (such as Company Directory). If you use Interaction Process Automation, a toolbar appears on the My Work Items view. You can change the appearance of these toolbars. Each toolbar can have its own unique set of toolbar buttons.
To customize a Queue Control, Directory, or My Work Items toolbar:
-
Select the view containing the toolbar you want to customize.
-
Right-click the toolbar and select Customize.
-
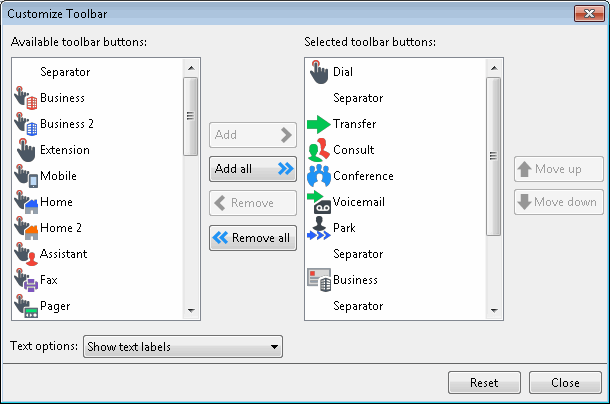
In the Customize Toolbar dialog box, perform any of the following actions:

Tip: When you customize a toolbar, pay particular attention when you point to a specific button. Some buttons may have the same label name, but have different icons. For example, the Customize Toolbar dialog box shows three separate Mobile buttons, but one button represents Transfer, one represents Consult, and another represents Dial. Also, some buttons have the same icon but different labels. For more information, see Directory Toolbar Buttons and Using the Queue Control Toolbar.
-
-
To add a button to the toolbar, from the Available toolbar buttons list, select a button name and click Add ->.
-
Result: The selected button appears at the bottom of the Current toolbar buttons list.
Tip: Insert one or more Separator lines to divide the toolbar buttons into groups.
-
-
To remove a button from the toolbar, from the Current toolbar buttons list, select a button name and click <- Remove.
-
Result: The selected button is removed from the Current toolbar buttons list and reappears in the Available toolbar buttons list.
-
-
To change the order of buttons on the toolbar, from the Current toolbar buttons list, select the button name and use the Move Up and Move Down buttons to move the button to the desired position on the toolbar.
-
From the Text options drop-down list, control whether the button names are displayed by selecting Show text labels or No text labels.
-
-
Do one of the following:
-
-
Click Close to save the new settings.
-
Click Reset to return the toolbar to its default configuration.
-
Related Topics


