


- Contents
Interaction Desktop Help
My Responses Editor
Requirements: See Working with Response Management.
To create and edit response items, use the Response Management Editor. It is a full-featured HTML editor with text formatting tools for messages. You can import HTML files, insert Response Macros, create hyperlinks, and add images.
To access the Response Management Editor, in the My Responses window, select the My Responses folder and do one of the following:
-
Click the Add a response item (plus sign) button or right-click in the center pane and select Add a response item.
-
Navigate to an existing item and then click the Edit the selected category or item (notepad) button or right-click in the center pane and select Edit.
For more information about creating or editing personal responses, see Create Personal Responses.
|
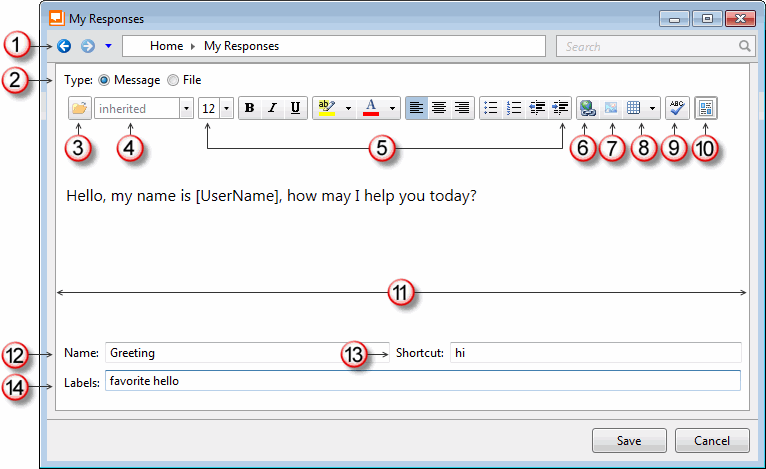
1 |
Navigation Aids |
To locate a response or view the items in a category, use the arrows, drop-down list, or navigation bar. |
|
2 |
Type |
Message or File indicates the type of response, either a text message or stored file. |
|
3 |
Insert document |
Import an HTML formatted file, Rich Text Format file, or plain text file into your response. |
|
4 |
Font |
You can select a font or use the default "Inherited" font setting. When you use a stored response created with the Inherited font, it adopts the font and font characteristics (size, color, and so on) of the text immediately preceding it in your email message. However, when you insert a response that has a selected font and other font characteristics, then the stored response appears as originally formatted. |
|
5 |
Font characteristics |
The editor includes a full range of text formatting tools. Tooltips identify each of the tools. |
|
6 |
Insert Hyperlink |
Turn a selected word or phrase into a clickable hyperlink. |
|
7 |
Insert Picture |
Insert images in any of the standard Windows formats, including JPEG, GIF, and PNG. You can edit the image, add a caption, and control a variety of layout options. |
|
8 |
Insert Table |
You can insert the grid for a simple table, then add the appropriate text. |
|
9 |
Spelling |
Click this control to spell check your text. |
|
10 |
Select a macro to insert |
Insert placeholder fields that are replaced when the response is used. Select a constant, interaction attribute or another stored response. For more information, see Create Response Macros. |
|
11 |
Editing pane |
Type, format, and edit your message here. Tip: Different email clients at your customer sites can interpret line endings differently. To avoid this problem, press Shift+Enter to create a new line. Press Shift+Enter twice to create a blank line between two lines of text. This creates line endings that all email applications can reliably interpret. Note: If you select the File response item type, the editing area becomes a target zone where you can drag and drop a file. |
|
12 |
Name |
Name identifies the response item, but does not have to be unique. If you do not provide a name, it defaults to the first few characters of a message or a file’s directory path. Note: Response Management provides a full-text search tool that uses the information in Name, Shortcut, and Labels along with the response item’s content to find a response. |
|
13 |
To make it easier to insert this response in a chat or email reply, assign a shortcut. For more information, see Use a Response Shortcut. |
|
|
14 |
Labels |
Labels provide more search terms. The "favorite" label creates a list of Favorite Responses in the Email Window for Outgoing Messages and the Chat Window. For more information, see Managing Favorite Responses. |
Related Topics