


- Contents
Interaction Process Automation Designer Help
Creating a Work Item
Before you begin to design a work item in IPA Designer, identify all the information that the work item needs to obtain.
For example, if a work item collects information for a credit application and your process will use a web service obtain the applicant's credit score, consult the web service to find out what information it requires. If you design a work item with a single text box for applicant name but you later discover that the web service needs separate first, middle, and last names, you'll need to go back and redesign your work item. Planning ahead will prevent wasted time.
You can design a work item with one page or with multiple pages. Multiple pages enable you to group information and controls to effect conditional logic or “branching” so that a user sees information on one page based on prior page inputs. You can also control the order in which the work item displays the pages and trigger actions between pages.
A work item can have as many pages as you want. However, if a work item has more than seven pages, consider dividing the information between multiple work items to make things simpler.
To create a work item:
-
Right-click the Work Items container and click New Work Item in the shortcut menu. You can also press Ctrl+W to create a new work item.
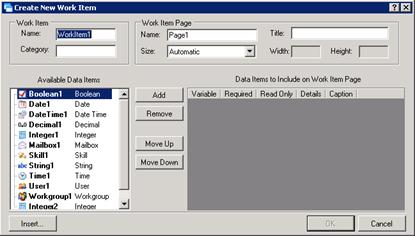
IPA Designer displays the Create a New Work Item dialog box (see figure).
-
In the Work Item section:
-
In the Name text box, type a name for the work item.
-
In the Category text box, type the name of the category for this work item. The category is displayed in the CIC Client and is used to organize a user's work.
Note: Categories and dynamic details apply to the entire work item, not to individual pages.
-
In the Work Item Page section:
-
In the Name text box, type the name by which the process will refer to the page. The default value is the word Page followed by the page number.
-
In the Title text box, type the title that should appear at the top of the page.
-
If desired, expand the Size drop-down list and select a predefined size or use the Width and Height text boxes to define a custom size.
-
Add data items (variables) to link with controls on the page:
-
In the Available Data Items list, click the desired data item, then click Add. You can also create a new data item "on the fly" by clicking the Insert button.
IPA Designer moves the data item into the included data items list. For more information, see Creating Variables for Work Items. The Available Data Items list does not include collections. If a user selects a non-collection variable that has a list of acceptable values, then IPA displays it as a drop-down list when added to the work item. -
As desired, select the check boxes to make the data item Required or Read Only.
-
To include the data item in the work item's dynamic details, select the Details check box.
-
If desired, edit the data item's caption by double-clicking the default text in the Caption column, editing the text, and pressing the Enter key.
-
If desired, use the Move Up and Move Down buttons to change the order in which the page displays controls for the data items.
-
Click OK.
In your workspace, IPA Designer displays the Work Item Overview view.
Tip: To redisplay the Work Item Overview view, double-click the work item in the navigation pane. You can display a work item page by double-clicking its title bar in the overview diagram.
- Set work item options (see figure):
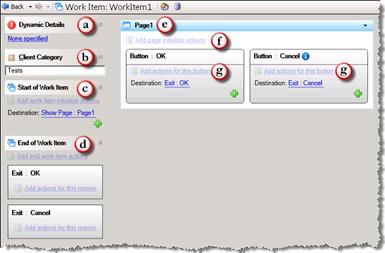
Tip: The green plus (+) icon indicates that the user can add an item of the appropriate kind, such as a work item page or a destination.
-
-
Click the Dynamic Details link (see figure, a) to set dynamic details for the work item. Dynamic details are required for each work item in your process. The CIC Client displays work item details in its Description column. You can use process variables or work item local variables in dynamic details, but you cannot use variables that are local to states or tasks, or variables that are present only in other work items.
-
In the Client Category text box (see figure, b), type the category for the work item. The user can use the category to filter work items on the My Work Items tab of the CIC Client.
-
Click the link(s) under Start of Work Item (see figure, c) to add actions that the work item should do when it loads or to change/add the first page the work item displays. For more information about controlling the order of work item pages, see Controlling the Order of Work Item Pages. For more information about starting work items, see Start of Work Item.
-
Click the link under End of Work Item (see figure, d) to add actions that the work item should do when it exits for any reason. In tasks, the Send Work Item to User action shows possible exit actions as plus (+) icons. The Exit: OK and Exit: Cancel actions execute after any actions you added to the end of the work item. For more information about ending work items, see End of Work Item.
-
Double-click the page title bar (see figure, e) to make changes in the work item page.
-
Click Add page initialize actions (see figure, f) to add actions that the page should do when it loads, before the page is displayed.
-
Click Add actions for this button (see figure, g) to add actions that the work item should do when a user clicks the button, before navigation or exit. For information about changing the destination after a button is clicked, see Controlling the Order of Work Item Pages.
-
- In the processes list, double-click the work item page.
IPA Designer displays the work item page in the workspace. You can then add controls, edit controls, move things around, and make any other graphical changes you want. -
To add more pages to the work item, follow the steps in Adding Pages to a Work Item.
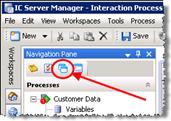
Another way to create a work item is to right-click the process name in the process list, point to Add on the shortcut menu, then click New Work Item. You can also press Ctrl+W to create a new work item. A third way is to click the New Work Item icon at the top of the Navigation Pane (see figure).