- Contents
Latitude Console Help
Add a Payment to a POD Account
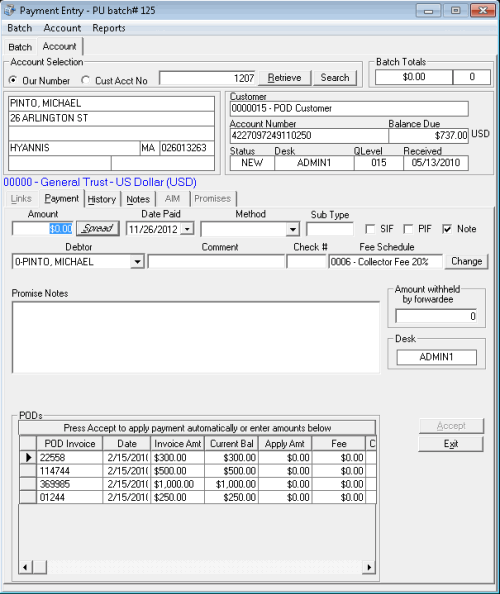
Use the Payment tab on the Account tab in the Payment Entry window to add a payment to a Particulars of Debt (POD) account. POD accounts use one or more entries (invoices), indicating debt segments of principle balances.
To add a payment to a POD account
-
In the Main Menu window, from the Apps menu, click Payment Entry. The Payment Entry window appears.
-
Do one of the following:
-
If you know the file or account number, do the steps to Retrieve an Account by Account Number.
-
To search for an account using simple search, do the steps to Search for an Account Using Simple Search.
-
To search for an account using advanced search, do the steps to Search for an Account Using Advanced Search.
-
On the Account tab in the Payment Entry window, click the Payment tab. A POD data grid appears with invoices listed in date order from oldest to newest.

Amount: Payment amount received.
Date Paid: Defaults to the batch date. To change the date, click the arrow and select the date from the calendar.
Method: Payment method.
Sub Type: Code to categorize the batch type.
SIF: (Settled in Full) If selected, the client considers the payment a settlement to the account.
PIF: (Paid in Full) If selected, the payment covers the entire balance and the client considers the account paid in full.
Note: If selected, the system creates a note when posting the payment.
Debtor: Defaults to the primary customer on the account. You can select multiple customers associated to the account.
Comment: More information regarding the payment or account.
Check #: Check number for a payment made by check.
Fee Schedule: Fee schedule currently assigned to the account. If your permissions allow, you can use a different fee schedule for this payment. For more information, see Change Fees for a Single Payment.
Note: If you set the Free Demand Days option in Fee Schedule maintenance for the account, and the account age places it within the free demand period for the fee schedule, a message appears. The message indicates that the account is within the Free Demand Period and the system doesn't calculate fees.
Promise Notes: Use promise notes for:
-
NSF accruals or to hold payment entry until you verify sufficient funds for a specific customer on an account.
-
Fee review for forwarded accounts.
-
Any miscellaneous account-specific information.
Invoice: POD invoice number.
Date: Date the system generated the invoice.
Invoice Amount: Total dollar amount due on the invoice.
Current Bal: Current balance of the invoice.
Apply Amt: Dollar amount of the payment to apply to the invoice.
Fee: Dollar amount on the invoice charged for fees.
Customer Branch: Client branch associated to the invoice.
Amount withheld by forwardee: Dollar amount of the payment that the forwardee (for example, attorney) who collected the payment withheld. The fees due to your agency don't include this amount.
Desk: Desk currently holding the account. If your permissions allow, you can change the desk so that you receive credit for the payment. For more information, see Change the Desk Assigned to an Account.
-
Complete the information and then click Spread to apply payments to the POD invoices in the order listed (oldest to newest).
-
Optionally, you can change the amounts in the Apply Amt and Fee Amount boxes in the data grid. If the payment amount is not equal to the sum of the amounts in the Apply column, a message appears in red. If the amount of the payment exceeds the balance owed, the overpayment amount appears in red under the Amount withheld by forwardee box. The system doesn't use this amount for calculating your organization's fees, so invoice amounts to the client are still correct.
-
When the sum of the amounts in the Apply column equals the payment amount, click Accept. The system applies the payment to the customer's account and includes it in the current batch.
Related Topics


