


- Contents
Interaction Attendant Help
Custom Operator Profile
Custom Operator profiles screen calls to the operator by examining the originating queue or Attendant Profile. Information about each call is compared to all operator profiles to select the profile that matches the call. If no match if found, the call is processed by a default operator profile.
Note:
If the New Profile button (![]() ) on
the toolbar is greyed out, or the New Profile option located in the Insert
menu is unavailable, you do not have the appropriate rights to create
a new profile. See your administrator for information about obtaining
your profile rights. However, if your Administrator
grants you the appropriate rights to create a new profile, Interaction
Attendant also automatically gives you the right to modify the profile.
This feature allows you to edit any profile you create.
) on
the toolbar is greyed out, or the New Profile option located in the Insert
menu is unavailable, you do not have the appropriate rights to create
a new profile. See your administrator for information about obtaining
your profile rights. However, if your Administrator
grants you the appropriate rights to create a new profile, Interaction
Attendant also automatically gives you the right to modify the profile.
This feature allows you to edit any profile you create.
Node Characteristics frame
Options in this frame name the profile, establish whether or not it is active, logged, or tracked for IVR reporting purposes. Unlike operation nodes, profiles cannot be assigned a digit, since profiles are always compared to the characteristics of a call.

Name field
The label you enter here becomes the name of the node in the tree structure.
Active check box
By default, forms are "on", or "active", which means that Interaction Attendant will process them. If you uncheck a form's Active check box, the name of the node turns gray in the tree to indicate that the form is inactive. Interaction Attendant and its handlers will thereafter ignore the form and its children. Use this feature to save a configuration that you are testing. Inactive forms are invisible to callers. When a node is inactive, it appears grayed out in the tree view.
Enable IVR Reporting
This option determines whether or not reporting data will be collected when control passes through this node. Several IVR Reports summarize this information. IVR Reporting is disabled by default. Enable it to capture the date, time and duration of time that the call remained in the node and its children. This option is hidden when Attendant is connected to a server that does not have reporting installed. For more information about this feature, see IVR Reporting Option.
Add entry to the Interaction log
When this option is enabled, information about this node is appended to the call's Interaction Log when the call enters this node. This helps track the path that a call took through Attendant. The Interaction Log is maintained for reporting purposes. See View the Interaction Log for details.
Configure Speech Recognition... button
Select the Configure Speech Recognition button to enable or disable speech recognition for the company directory, on menus, or both. By default, speech recognition is enabled for the company directory. If you choose to enable speech recognition on menus and leave it enabled for the company directory, callers will not be prompted to say the name of the person they want to reach.
To keep both options selected and direct the system to ask callers to say the name of the person or department they wish to transfer to, you must add it to the main greeting prompt. For more information on configuring speech recognition at the profile level, see Enable Speech Recognition for a Profile.
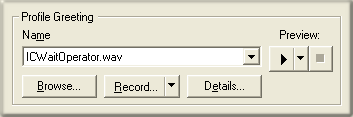
Profile Greeting
These embedded audio controls manage the optional greeting that plays when a call enters this profile. See manage voice prompts for more exhaustive information.
Call Processing Style button

This button opens the Call Processing Style dialog. It determines whether calls are directed to a menu (Auto Attendant Processing) or to a User, Station, Workgroup queue, or operator profile (Direct to Queue Processing). Auto Attendant Processing is used by default—operator calls are directed to the menu attached to the best matching operator schedule. In other words, Call Processing Style determines whether calls are directed to:
-
A menu attached to a schedule in this profile. This is the default call processing behavior.
-
A user, station, or workgroup queue.
-
An inbound profile.
Language frame
Profiles can set a language based upon incoming call characteristics of some sort. The language list box affects the language used to play back voice prompts. It presents a list of languages defined on the CIC server, and some special options.

Language list box
If a user selects a language from the list, that language becomes the current language used to play prompts.
If a user selects <Default>, prompts will be played using the server's default language.
If a user selects <Do Not Change>, the language that is currently set on the call won't be updated by this Profile. For example, a caller might select Spanish in a menu. If the call is routed back to this Profile somewhere down the line, the Profile would play the prompt using its language setting unless <Do Not Change> is selected. This option tells the Profile not to change the language set by another node, if the call returns to the profile.
Incoming Call Selection frame
This section of the page defines call characteristics that will be compared to the characteristics of an incoming call to determine whether it should be processed by this profile. A custom operator profile can filter calls based upon the user queue, workgroup queue, or Attendant Profile that the call came from.
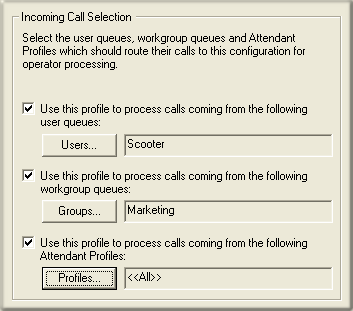
You can filter on any or all of these criteria at the same time. If you check a check box, you must configure its associated field. If you don't, a red exclamation point (!) will appear next to the profile in the tree. If you move the mouse pointer over the node, tool-tip help will appear to explain the error. At runtime, your choices are evaluated using the logical OR operator. If more than one criterion is specified, the interaction matches the profile if any of the profile's criteria are met.
Use this profile to process calls coming from the following user queues check box
Check this box to process calls that originate from user queues. When the Users button is pressed, a dialog lists the names of user queues defined on the server.
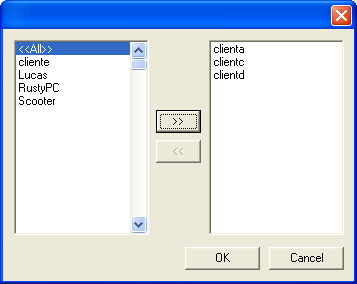
Select user queues in the list on the left. Click and drag to make contiguous selections, or ctrl-click to make discontinuous selections. Then press >> to add your selections to the list on the right. It contains the names of queues that you have selected. Items can be removed from the rightmost list by selecting them and pressing <<. To quickly select all user queues (present and future), add <<All>> to the right side list.
When you are finished, press OK to dismiss the dialog. The names of the first few selections are displayed in the read-only field. If you press Cancel, the dialog is closed without saving changes.
Use this profile to process calls coming from the following workgroup queues check box
Check this box to process calls that originate from workgroup queues. When the Groups button is pressed, a dialog lists the names of workgroup queues defined on the server.
Select workgroup queues in the list on the left. Click and drag to make contiguous selections, or ctrl-click to make discontiguous selections. Then press >> to add your selections to the list on the right. It contains the names of queues that you have selected. Items can be removed from the rightmost list by selecting them and pressing <<. To quickly select all workgroup queues (present and future), add <<All>> to the right side list.
When you are finished, press OK to dismiss the dialog. The names of the first few selections are displayed in the read-only field. If you press Cancel, the dialog is closed without saving changes.
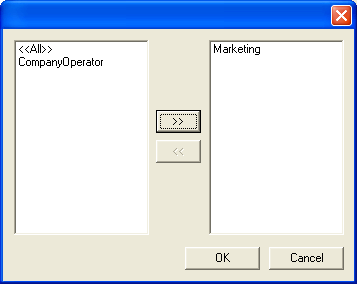
Use this profile to process calls coming from the following Attendant Profiles check box
Check this box to process calls that originate from an Attendant profile. When the Profiles button is pressed, a dialog lists the names of Profiles defined on this server.

Select profiles by name in the list on the left. Click and drag to make contiguous selections, or ctrl-click to make discontiguous selections. Then press >> to add your selections to the list on the right. It contains the names of profiles that you have selected. Items can be removed from the rightmost list by selecting them and pressing <<. To quickly select all profiles (present and future), add <<All>> to the right side list.
When you are finished, press OK to dismiss the dialog. The names of the first few selections are displayed in the read-only field. If you press Cancel, the dialog is closed without saving changes.
Related Topics