


- Contents
Interaction Recorder Client for IC Business Manager Help
Working with Recording Search Results
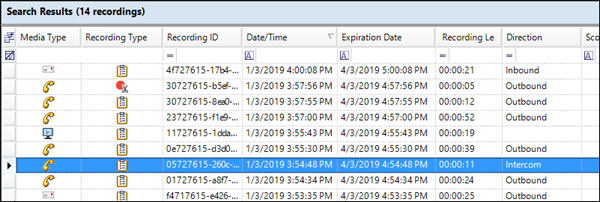
When a recording search is run, the results are displayed in the Search Results view in the Workspace. Multiple searches can be displayed in tabs in the Workspace. A list of recorded interactions is displayed in a grid, which gives details of the recording. Use the Search Results view to review the details of an interaction, playback a recording, delete a recording, export a recording, modify a recording expiration date, or archive a recording. The Search results view contains the Recordings grid, the Media Details pane, and the Details pane.
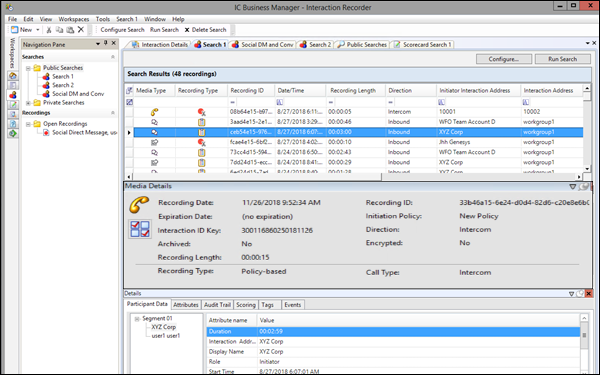
Recordings grid
The results of a recording search are displayed in the grid in the top pane of the Workspace. The grid displays a list of recordings, by Date/Time that are found for the search, in descending order (newest to oldest).
Notes
- To paste recording information into another application, use Ctrl+C in
the recordings grid to Copy an entire row, or multiple rows, to the clipboard.
- When there is more than one scorecard associated with a recording, the
Scoring Status column displays
the scorecard at the highest level of completion. For example, if a recording
has two scorecards and one of the scorecards is Completed
and the other is Saved, the Scoring
Status column displays Completed and the Scoring User column displays
the user name for the owner of the Completed scorecard. If there is more
than one scorecard at the highest level of completion, the Scoring User
column displays the user who is alphabetically first by last name.
- The Scoring User column displays the names of the users that scored the
individual recordings displayed in the Search Results grid. If the user,
viewing the Search Results, has the Can
Score Recordings Security Policy rights for a recording, the Scoring
User name is displayed in the Scoring User column. If the user does not have the Can
Score Recordings policy rights for the recording, the recording
is not displayed in the search results.
- If a recording is in progress,
the value in the Recording Length
field is blank in the search results grid.
- If a call recording is in progress when the recording is opened, the
Playback window is replaced with the message This
recording is currently in progress and cannot be retrieved at this time.
You can monitor a recording in process. For more information, see Monitor
a Live Call.
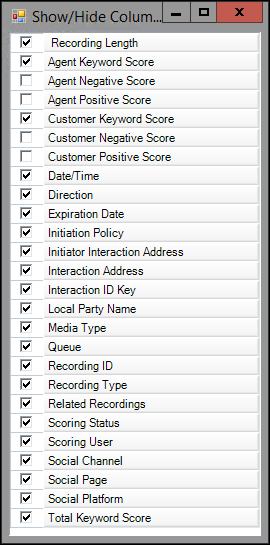
Selecting Fields for the grid
To change the Fields that are displayed in the grid, click the Field Chooser  on the top left of the grid.
In the Show/Hide Columns dialog select the Fields to display in the grid.
Sorting columns in the grid
To sort a grid column in ascending or descending order, click the Field name.
Refining search results
To further refine the search results, use the Filter Criteria selection
fields  below each Field. To create
a field filter for the search results displayed in the grid, select the
field below the Field name. The field search filter is displayed. To select
an operand for the search, click . In
the drop-down list, select the search criteria. Depending on the field
and your selections, an additional dialog might be displayed. The search
results are displayed according to your search filter. To clear the filter
criteria, in the field click
below each Field. To create
a field filter for the search results displayed in the grid, select the
field below the Field name. The field search filter is displayed. To select
an operand for the search, click . In
the drop-down list, select the search criteria. Depending on the field
and your selections, an additional dialog might be displayed. The search
results are displayed according to your search filter. To clear the filter
criteria, in the field click ![]() . To clear all
filter criteria, click
. To clear all
filter criteria, click ![]() at the
left on the Filter Criteria selection fields grid row.
at the
left on the Filter Criteria selection fields grid row.
Recording Details
When you select a recording in the Search results list, detailed information on a recording is displayed in Media Details and Details panes. These panes are displayed at the bottom of the Workspace and can be moved and docked to another location on your screen.
Open a Recording
To Open a Recording, double-click a recording in the Search Results grid. You can also right-click on a recording, and on the shortcut menu click Open Recording.
Recording shortcut menu
When a recording is selected in the Search Results grid, you can right-click on the recording to display a shortcut menu. From the Shortcut menu, you can:
Notes
- A Recording can be deleted from the
Recordings grid in the Search Results View. For more information, see
Delete
a Recording.
- Screen recordings cannot be exported.
If a screen recording is included in a selection, Export is not available
on the shortcut menu.
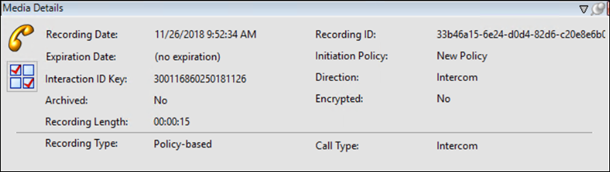
Media Details pane
When you select an interaction in the search results grid, details of the interaction are displayed in the Media Details pane. The details include: Recording Date, Recording ID, Interaction ID Key, Initiation Policy, Archived indicator, Direction, Recording Length, Encrypted indicator, Recording Type, Snippet Initiator, Call Line, and Call Type.
To undock the Media Details pane from the Workspace, double-click the title bar. The Media Details pane moves from the Workspace. To move the Media Details pane to another place on your screen, click the title bar and drag the window.
To dock the Media Details back in the Workspace, right-click, and on the shortcut menu, click Floating to clear the check box.
To hide the Media Details pane in the Workspace, right click on the title bar, and in the shortcut menu click Auto Hide. A tabbed page is displayed at the bottom of the Workspace. Click the tab to display the Media Details view.
Details pane
The Details pane displays additional interaction details for the selected interaction. The Details pane includes the following tabbed pages: Participant Data, Custom Attributes, Audit Trail, Scoring, and Tags. If Interaction Analyzer Keywords are associated with an interaction, a Keywords tab is also displayed.

To undock the Details pane from the Workspace, double-click the title bar. The Details pane moves from the Workspace. To move the Details pane to another place on your screen, click the title bar and drag the window.
To dock the Details back in the Workspace, right-click, and on the shortcut menu, click Floating to clear the check box.
To hide the Details pane in the Workspace, right click on the title bar, and on the shortcut menu, click Auto Hide. A tabbed page is displayed at the bottom of the Workspace. Click the tab to display the Details view.
Scoring page
Use the Scoring page in the Details pane to access a Questionnaire and Score a recording. Questionnaires that have previously been assigned to a recording are displayed on the Scoring page. Additional Questionnaires can be assigned to the recording on the Scoring page. Only questionnaires that have been published are available for scoring.
User Scorecard Access
Non-admin users only see Questionnaire scorecards that they have scored. To allow users to see all scorecards for a recording, the CIC administrator can create a Security Policy so a user can view scorecards. This Security Policy can be applied to Agents or Roles. Questionnaire Directory Admin Access and other security rights will still apply. For non-admin users, in order to finish a scorecard that has already been scored by another user, the user must first save the scorecard to take ownership and then the user can finish the scorecard.
Assigning a Questionnaire
To assign a questionnaire, click Assign Questionnaire, and select a questionnaire from the Select Questionnaire dialog.

When you click Assign Questionnaire the Select Questionnaire dialog is displayed. To assign a user to score the recording, select the Scoring user from the drop-down list. To select the completed scorecard for calibration purposes, select the Mark scorecard for calibration check box. To assign a questionnaire to a recording you must hve the Can Assign Questionnaires security right, assigned in Policy Editor.
To score a recording, on the Scoring page, click Score. The Questionnaire to score the recording is displayed and the media player is launched displaying details of the recording.
Tags page
The Tags page displays Tags for a recording that were created in Policy Editor and assigned to a recording.
Tags can be added and edited in the Playback window Details pane on the Tags page. To open the Playback window, click Modify Tags. The Playback window is displayed. If the Details pane is not showing, in the Playback window right-click, and on the shortcut menu point to Show and click Details.

Events page
The Events page displays the Hold Event information. This tab is displayed for each recording if the user has sufficient security and access rights to be able to retrieve or playback the recording.
![]()
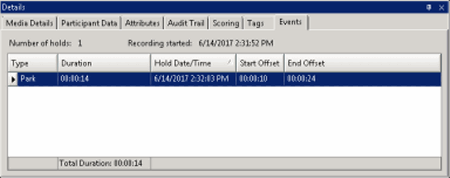
By default, the rows on the Events page are sorted in ascending order by the Start/Date/Time value. The columns displayed on the Events page are:
-
Type This value indicates the type of Hold event that occurred within the recording. Valid Hold display values are: Hold, Transfer, and Park.
-
Duration This value indicates the length of the Hold, rounded to the nearest second. The summary row for this column displays the total duration of the Holds (summed before any rounding) for this recording, and is rounded to the nearest second.
-
Hold Date/Time This value displays when the Hold began in local Date/Time. The summary row for this column displays the total number of Holds that occurred for this recording.
-
Start Offset This value displays when the Hold began as an offset from the beginning of the recording, rounded to the nearest second.
-
End Offset This value displays when the Hold ended as an offset from the beginning of the recording, rounded to the nearest second.
Note: If the duration for a Hold event is less than .5 seconds and greater than zero (0) seconds, the Event Duration states less than 1 second.
Related Topics